Tuesday, August 28, 2007

Cutie Pie card


I am loving this Cutie Pie designer paper! Those little triangle photos in the catalog don't do it justice. I made this card for a demonstrator challenge to use a designer paper and coordinating colors only. I just love this pinwheel-style flower. I saw it on Pat Huntoon's blog: http://patstamps.blogspot.com . She shows lots of awesome techniques; in fact, she publishes a newsletter called Technique Junkies, which I highly recommend.

Anyway, the petals are made from the small tag punch. (You can use the regular tag punch but use 7 instead of 8.) To make each petal, you just fold the left side over to meet the right and then fold that piece back on itself. I used the ticket corner punch on all of the paper pieces and highlighted the corners on the bashful blue piece with gel pen dots. The flower and brad from the Pretties kit covers up the messy center!

Supplies (all SU): Stamps: Birthday Hugs and Wishes; Paper: Whisper White, Bashful Blue, Rose Red, Cutie Pie designer paper; Ink: Rose Red; Accessories: ticket corner punch, Pretties kit, cutter kit, Fairy Tale ribbon originals, white gel pen, small tag punch

Sunday, August 26, 2007

Scrapbook Page


I can't remember the last time I did a scrapbook page. But I needed something big for my new clothespin. So I decided to scrap these 2 photos from the Minneapolis regional last fall. It seemed natural to used Double Line Doodles, the stamp set I got there. They gave us the supplies for a 6X6 page and a 12X12 page. I combined the 2 designs they provided into this 8X8 that I did on the new textured cardstock. I like the look of the color blocking. The flowers are stamped and then colored in with the watercolor crayons in the same color as the ink. Thanks for looking!
Supplies (SU except staple): Stamps: Double Line Doodles; Paper: Confetti White, Certainly Celery, Real Red, More Mustard, Sahara Sand textured, tag sheet; Inks: Certainly Celery, Real Red, More Mustard, Real Red marker; Accessories: staple, natural hemp twine, Certainly Celery button, watercolor wonder crayons

Fall Frenzy Promotion

Stampin' Up! has announced a great promotion for the month of September called Fall Frenzy. When you spend $30, you can purchase one each of any or all of the following 6 sets for 30% off! I love it when SU offers these deals!

Item Page Number Description Discounted Price
105355 26 Bitty Boos Too $12.57
109284 29 Haunting Halloween $13.27
107383 30 Thoroughly Thankful $16.07
109373 108 Autumn Fest $16.77
109421 91 Elementary Essentials $19.57
110366 17 Stem Silhouettes** $22.37

**Stem Silhouettes is in the Holiday Mini Collection

Sorry about the wonky table. I tried to space it out, but it won't post that way! I'll be sending out a flyer on Sept. 1.

Saturday, August 25, 2007

Giant Clothespin


I bought this giant clothespin at Archiver's last weekend. It's 9 inches tall! I'm actually keeping it for myself, which I don't do very often. So of course I had to make it purple. First I whitewashed it with acrylic paint. Then I used Mod Podge to apply Almost Amethyst Prints paper that I have from the Palette O'Prints. I thought about adding some chipboard to the sides, but nothing really looked right. So I just added the amethyst ribbon from Fairy Tale Ribbon Originals. I like how it turned out! A regular photo is too small, so I'm going to do a small scrapbook page for it, either 6X6 or 8X8. Hopefully, I'll get that done tomorrow, so stay tuned!

People to People Reunion Picnic

We went to a reunion picnic today for the group that Daniel went with to Europe. Some kids from the Bemidji group were even able to come. They had so much fun together! One of the trip leaders told us that she would be happy to travel with any of the kids again because they were such a great group. The parents are all nice, too, and we had lots of fun!

Wednesday, August 22, 2007

So Long, Farewell, Auf Wiedersehen, Adieu...


No, I'm not going anywhere! This is a going away card for one of my supervisors. It's so hard to make cards for work because I have to make them big so everyone has room to sign. This card is 5 1/2 X 8 1/2. I am loving the new Apple Cider designer paper from the Holiday Mini. The colors are perfect for fall. And I finally used my Wild Wasabi ribbon!

Supplies (all SU): Stamps: Loads of Love, Loads of Love Accessories; Paper: River Rock, Naturals Ivory, Apple Cider designer; Ink: StazOn Black, Wild Wasabi, Chocolate Chip craft; Accessories: On Board Accents, watercolor wonder crayons, Wild Wasabi ribbon

Monday, August 20, 2007

Holiday Mini swap card


I freely admit that I'm a liar. I said that I would stamp and post yesterday, and I did neither. I was still pooped from Higher Ground, so I sat on my couch and napped and read and stuffed my face with leftover kettle corn.

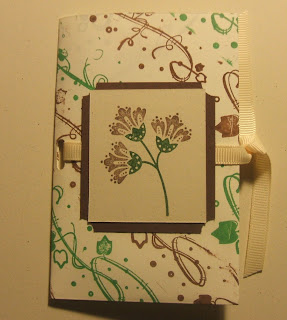
But my swap has to be mailed out on Wednesday, so I am back at work. I signed up for the Autumn Leaves wheel. It's hard to design a project around a wheel, but I love this little gift card holder. It's just an envelope folded in half. You cut off the left half of the flap and adhere the right half. This creates a pocket on the left side for the gift card. The gift card goes further down into the pocket, but I pulled it out so you could see it in there. I used the slot punch along the folded edge to help hold the ribbon in place. You can also do an extra-large envelope and put a seed packet inside. I did that back when SU had the really cute dandelion set and matching wheel; it was perfect! Maybe Garden Whimsy would work for that too; I really want that set!

Supplies (all SU): Stamps: True Friend, Autumn Leaves wheel; Inks: Chocolate Chip, Garden Green; Paper: Naturals Ivory, Chocolate Chip; Acc: Very Vanilla med envelope, Very Vanilla narrow grosgrain, wheel guide, ticket corner punch, slot punch

Saturday, August 18, 2007

Rained Out at Higher Ground

Getting ready to hit the road on Friday morning

DecembeRadio. When we were at the autograph table, the lead singer introduced himself to me and shook my hand!
Rhonda and I had our photo taken with Building 429.


The lead singer of Superchic[k]. They were totally rockin'! They sang a great song for girls about how you need a guy like you need a bowling ball dropped on your head.


Third Day closed out the day, and they were awesome as always.


Definitely less energy than we started the day with!
We met at the church at 9 AM. We took a while to get going, and we got to the festival about 1:45. It was a great day: 75 degrees and overcast. There were a few sprinkles during Superchic[k], but that was all. Third Day finished up about 11:30, and it was about 12:30AM by the time we got to the motel. Rhonda was in a room with the girls, and I was with the boys. The alarm went off in our room at 6 AM!! We woke up to rain with a forecast that it would continue all day and into tomorrow. So we decided to head home. We went to the Mall of America, and it was a zoo! It took us forever to get in and get parked. Daniel and Sean went to see The Bourne Ultimatum. The girls shopped. Rhonda and I went to a few clothing stores and Archiver's. I felt guilty shopping there! I only bought 2 things: a huge wooden clothespin and a flip album with a built-in stand. I'll post when I'm done with them. Then it took us almost an hour to get out of the mall parking ramp! We stopped at Arby's for supper and pulled into the church parking lot a little after 9PM. I'm really looking forward to sleeping in my own bed; I slept on an air mattress last night!
I promise I will stamp tomorrow, so stay tuned!


Thursday, August 16, 2007

Fun Triangle Trifold Card


Another card from the archives. This was Mama's Mother's Day card. That's why I used turquoise, which is her fave! This is a fun card to make. Here is the link to Beate's great tutorial on SCS, including pictures: http://www.splitcoaststampers.com/resources/triangletrifold.php . If you have any questions about how to make the card, please e-mail me or leave a comment. I'll be happy to help! I used craft ink for the main image. I find it gives a more solid impression when using a solid image stamp. The ribbon and brass template are retired. The paper is available in a different color.
Supplies (all SU): Stamps: Bodacious Bouquet, Everyday Flexible Phrases; Paper: Whisper White, So Saffron, Old Olive, Notations ds paper; Ink: Cool Caribbean, Taken with Teal craft; Accessories: Bodacious Bouquet classy brass template, white gel pen, crafters tool kit, white organdy ribbon

I will be gone for the weekend to Higher Ground Music Festival. My friend (and fellow stamper) Rhonda and I are taking 5 teenagers from our church youth group. We will be having fun for sure! (That was only partially sarcastic.) I don't know if I will be able to post on Sunday or not, but I promise I will get back to stamping next week!


Tuesday, August 14, 2007

More from the archives


I know I won't get to stamp tomorrow night as Daniel asked me to take him to the movie theater so he can see The Simpsons Movie with JoLynn. He will buy my ticket in exchange for the ride, so it's worth it!
I made this card in June when my co-worker, Jeff, and his wife, Keri, had a baby. Their fourth! It uses a set from the Spring Mini, That's Nice, that didn't make the catalog. I was bummed; it's a great set. It's a big card--5 1/2 X 8 1/2. They are hard to make! But I was happy with how it turned out. (One of the supervisors at work today told me I'm stamperific because of the cards I've been making for work! Too funny!) I used craft ink for the 2 lighter colors on the card base so they would show up better. Heat setting craft ink makes the color true, so don't just air-dry them!
Supplies (all SU): Stamps: That's Nice, Seeing Spots, Polka Dots & Petals; Paper: Whisper White, Bashful Blue; Inks: Bashful Blue & So Saffron craft, Night of Navy & Bashful Blue & So Saffron classic; Accessories: On Board Accents, white gel pen, cutter kit, blue gingham ribbon, very vanilla & night of navy narrow grosgrain ribbon

Stampin' Up! New Demonstrator Special

Stampin' Up! is offering a free family of full-sized ink pads as an added bonus if you sign up as a demonstrator. What a great deal! The starter kit is already great, a $300 value for $199, and this just makes it even better. Contact me if you are interested.

OK, I am lame. I have no new projects to post. I HAVE to finish my swap tonight to mail it tomorrow. Hopefully, tomorrow night I can play and post something new.

Saturday, August 11, 2007

Which One Do You Like Better?


I spent some time working on my swap card. I knew I wanted to use the scallop circle punch and Big Flowers. I decided it would look cool to do 4 of them popped on the black textured cardstock. I looked at the SU Color Combo sheet for a combo and decided on Soft Sky, Orchid Opulence, Pumpkin Pie and Old Olive. I chose that one because it's one I would never ordinarily use. Well, the Pumpkin Pie was just too much, so I changed it to Groovy Guava. I like that much better! Then as I looked at the card, I really wasn't sure about the Soft Sky. There wasn't really anything to tie it in to the rest of the card. So I decided to try Old Olive as the card base to tie in to the Old Olive layers on the flowers. I'm still undecided, so I need your opinion. Please leave me a comment to let me know which you prefer. Thanks for looking!


Supplies (all SU): Stamps: Big Flowers, Hugs and Wishes, Paisley BG; Paper: Groovy Guava, Orchid Opulence, Old Olive, Soft Sky, Basic Black textured; Ink: Black Staz-On, Soft Sky, Old Olive, Orchid Opulence, Groovy Guava; Accessories; 1 1/4 & 1 3/8 & scallop circle punches, Pretties kit, metallic eyelets, gold brads, black gingham ribbon, 1/8 & 1/16 hole punches, Crop-a-dile

What Color is Your Brain?

On Saturday mornings, I usually go through all of the MANY blogs I have saved to my favorites. (The list on the right are the ones I check almost daily.) This morning, I found a quiz called What Color is Your Brain? Here are my results, and I SWEAR I didn't cheat. This is really what I got. Click on the link below my results to see what color your brain is.


Your Brain is Purple

Of all the brain types, yours is the most idealistic.
You tend to think wild, amazing thoughts. Your dreams and fantasies are intense.
Your thoughts are creative, inventive, and without boundaries.

You tend to spend a lot of time thinking of fictional people and places - or a very different life for yourself.

I plan to stamp today as I still have 1 swap to do. I'm forcing myself to complete it before I can play with my new stuff. So check back later to see how I did.

Thursday, August 9, 2007

To Cheer Up a Friend

One of my friends at work lost her house over the weekend. While she and her husband were out golfing, an old air conditioner caught fire and totally destroyed their home. We are collecting funds to help her out, and I volunteered to make a card. I wanted it to be cheery, and I think this is. There's not much stamping on it. I used the new chipboard and double-stitched ribbon; only the leaves are stamped. I used craft ink on the chipboard and heat set the ink so the color would be true. I got the color combo for the flowers from the color wheel. Inside the card it says, "Friendship improves happingess and abates misery by doubling our joy and dividing our grief." The saying is from the set Friendship Flowers. I don't have that set, so I printed it on my computer.
Supplies (all SU): Stamps: Bodacious Bouquet; Paper: Soft Sky, Wild Wasabi, Certainly Celery Prints Designer Paper; Inks: Wild Wasabi Classic, Cameo Coral craft, Barely Banana craft, Rose Red craft; Accessories: On Board Blossoms & Basics, crop-a-dile, Pewter jumbo eyelets, Neutrals buttons, mini glue dots

Also, today I got my Holiday Mini preorder. So I thought I'd give you a peek at the die-cut rubber. This new set, True Friend, is gorgeous! I don't know what it has to do with a holiday, but I love it!


This is the full sheet. You can see the cut outline around each image.


Here's a close-up of one flower.

Tuesday, August 7, 2007

From the Archives

I made this card a couple of months ago. It's a great example of how tastes can change. When I first started stamping, Bold Brights were my favorite. Now I rarely use them! But I do really like this card; it's so spring-y and fresh looking.
I have book club tomorrow night (Brave New World--Ugh!). But I am planning to stamp on Thursday; gotta get that 2nd swap card done PLUS my holiday mini pre-order is arriving. I was good; really, I was! So look for something new on Thursday, and I'll post all about my experience with the die-cut stamps!
Supplies (all SU): Stamps: Polka Dots & Petals, Polka Dots & Paisley, Petals jumbo wheel; Paper: Whisper White, Gable Green, Lavender Lace, Pixie Pink; Ink: Green Galore (for wheel), Lavender Lace, Pixie Pink, StazOn black, Pixie Pink & Gable Green markers; Accessories: ticket corner punch

Sunday, August 5, 2007

New Catalog Swap Card #1


Whoohoo! I finally got one of my swaps done. They're due by the 15th, and I stupidly signed up for 2. I know it will be worth it to get back 20 cards made with new sets from the catalog. I'm pleased with how this card came out. It's based on a design by Sharon Harnist for the SCS Dare to Get Dirty challenges last week. It would be very easy to change the sentiment to fit whatever occasion you'd like. This would be a great card for a guy also.
Supplies (all SU): Stamps: With Gratitude, Flannel Plaid, Canvas; Paper: Naturals Ivory, More Mustard, Really Rust, Old Olive; Ink: Pumpkin Patch Spectrum pad, Old Olive, Ruby Red, Chocolate Chip; Accessories: Very Vanilla narrow grosgrain ribbon, ticket corner punch, horizontal slit punch

Saturday, August 4, 2007

Beate's One Sheet Box

This cute box was created by Beate Johns. Her blog link is to the right, and here's the direct link for directions for the box: http://beate.blogs.splitcoaststampers.com/2007/07/04/pick-a-petal-one-sheet-box/ The best thing about this box to me was the topper and the way the little flower holds it closed. I sent this project to my mama and her friends, but they had trouble figuring out how the box was put together. So I thought I'd post a few pics to help out.
This is the completed piece before assembly.

This is how it folds together on the inside. Beate left hers unadhered, but I decided to adhere the flaps on each side. This helps the box stay closed too.


Here's what it looks like with the flaps adhered on both sides. You do have to push the sides in some in order to close the box. You could also leave off the flower piece and punch holes in each tall side and tie it closed.


Thursday, August 2, 2007

Quarter Fold Card

This is a Quarter Fold Card. I think it's really cool and different, so I thought I'd show you how to make it. My first mini-tutorial!
Supplies (all SU): Stamps: Bud Basics, Warm Words; Paper: River Rock, Soft Sky; Inks: River Rock, Soft Sky, Basic Gray; Accessories: Pretties Kit, Crop-a-dile, Jumbo Pewter eyelets

The first piece of cardstock is 4 1/4" X 11". (A sheet of cardstock cut in half longways) Score at 2 3/4" and 8 1/4".


The second piece of cardstock is the standard 5 1/2" X 8 1/2". (A sheet of cardstock cut in half the other way) Score at 2 1/8" and 6 3/8".


Adhere the two pieces of cardstock together, forming a cross. Put the long piece of cardstock to the back.


Fold the flaps in like you are closing a box. Decorate the exposed pieces as desired.

Here is another one I made last winter using the SAB set Happy Harmony and Vintage Violet and Cool Caribbean. Oh, I miss that color!