Thursday, December 30, 2010

SCS Creative Crew coming 1/1/11!

Sorry I don't have anything to post right now. I am doing some super secret stamping for the brand new Creative Crew demo challenges coming to SplitCoastStampers at noon CT 1/1/11! We have 7 talented demonstrators working hard to showcase Stampin' Up products. The challenges are for demonstrators, but the gallery will be available to everyone! That means more SUO (Stampin' Up Only) samples for all of you to enjoy!
Happy stamping!

Jana Signature

Tuesday, December 28, 2010

Mix of old and new

Miracles do happen; I made a card today! And it turned out just like I wanted it to! I am in the midst of reorganizing my stamping area due to the fact that the amount of stuff in my house has just doubled due to my marriage ONE MONTH FROM TODAY! While I was moving my stamp sets, I decided to go through the few retired sets I keep to get rid of a few more. I found this set from 2005, Easy Elegance. I have always loved this set, and I was so sad when it did not make the big catalog! I thought I would make one card with it and part with it, but now that I've used it, I might keep it for a while longer.
Today's project is a mix of old and new, both product and colors. The old is, of course, Easy Elegance. The new is First Edition DSP from the upcoming Occasions Mini. It looks like pages from old books, and it's thinner than our regular DSP which makes it great for layering without adding weight. The color combo is from the color coach: Basic Black, Old Olive and Daffodil Delight. It is just the perfect sunny yellow!
The card base is 4" X 10 1/2" Very Vanilla scored at 5 1/4" adhered to a 4 1/4" X 5 1/2" piece of Basic Black. I cut a 3 X 3 piece of First Edition then cut it into 3 1" pieces. I lightly sanded them so the black ink would be a bit lighter. These are adhered to 1 1/4" X 3 1/4" Basic Black.
For the ribbon treatment, I cut a slit in the Old Olive satin ribbon and pulled the other end through. Daffodil Delight ribbon tied in a knot holds it in place. I really like this as it stays fairly flat for mailing and adds a second touch of color. It also works great with linen thread!
Supplies: Stamps: Easy Elegance; Paper: Very Vanilla, Basic Black, First Edition DSP; Ink: Daffodil Delight, Old Olive; Accessories: sanding block, Old Olive satin ribbon, Daffodil Delight narrow taffeta ribbon
Happy stamping!
Jana Signature

Friday, December 24, 2010

Christmas card from Mama

Here is the Christmas card that Mama sent me. She was inspired by my poinsettia punch art card, but she decided to just use the bird wings. I think she told me that she punched out 35 wings! Isn't it beautiful?
Happy stamping and Merry Christmas!
Jana Signature

Wednesday, December 22, 2010

Finished scrapbook page

Here's my finished scrapbook page. I added a border to the top and bottom of the photo. This page is in a hanging page holder that I have on my desk. My friend Rhonda gave it to me for Christmas a couple of years ago.
Happy stamping!
Jana Signature

Monday, December 20, 2010

Occasions Mini sneak peek!

This card features 2 items from the upcoming Occasions Mini: Springtime Vintage DSP and Pear Pizzazz seam binding ribbon. There are more yummy colors of ribbon too, including Baja Breeze!
The sentiment is from the set Hodgepodge Happiness. You may not have noticed it in the main catalog, but all of the images are made to fit in the Hodgepodge Hardware! Genius!
Happy stamping!

Jana Signature

Saturday, December 18, 2010

SS kit card # 3

This one is my favorite! I love the colors and that DSP is fabulous!
Happy stamping!
Jana Signature

Wednesday, December 15, 2010

Simply Scrappin' card # 2

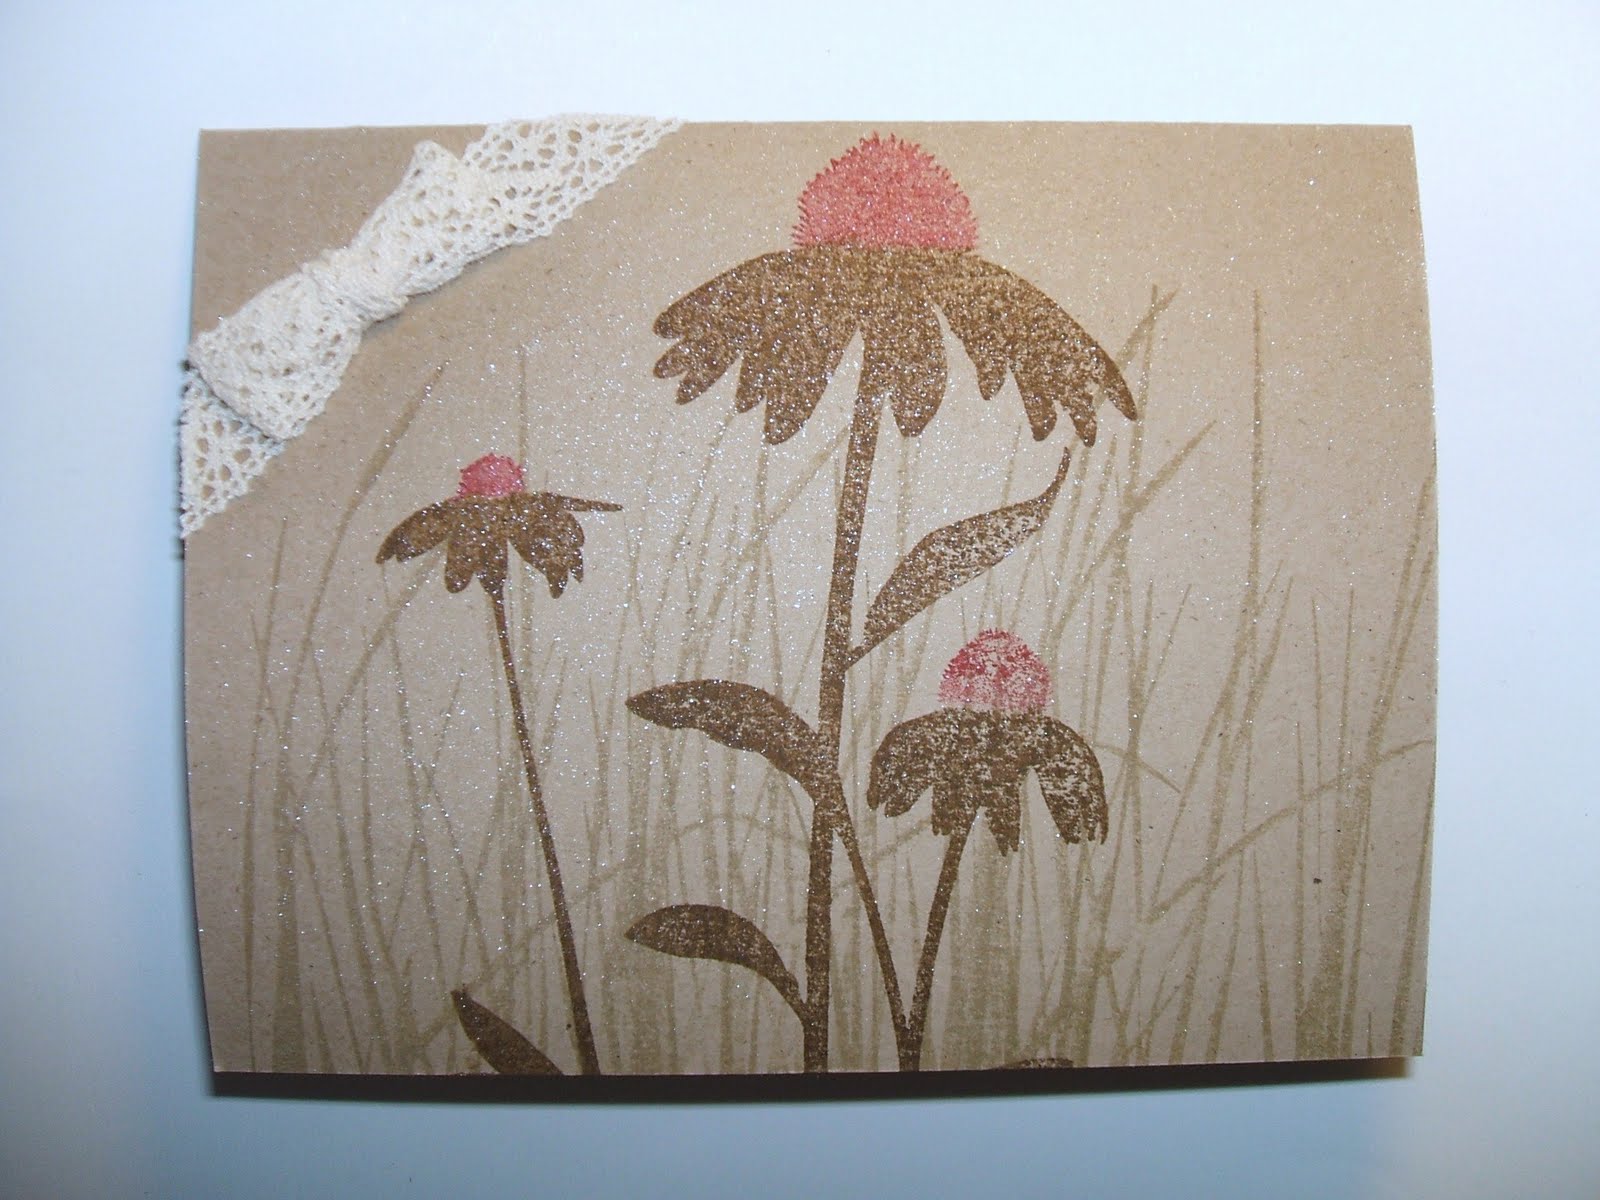
Here's card # 2. I love the combination of Tempting Turquoise, Pumpkin Pie and Chocolate Chip!
Happy stamping!
Jana Signature

Monday, December 13, 2010

SS kit scrapbook page

Here in southern California, we are having a heat wave! While Minneapolis got enough snow to collapse the roof of the Metrodome and Duluth got a dusting before the temperature dropped below zero, it was sunny and 86 here yesterday when I went out to grab lunch. I didn't bring any shorts with me either! After today, the highs will be in the 60s; still no complaints from me!
Yesterday, I made 2 cards and a scrapbook page, so I have postings for the rest of the week. Whoohoo! Here is the 6X6 scrapbook page I made. I wish I had the picture with me so I could have finished it, but I'll do it as soon as I get home this weekend. There are photo corners in the kit that I'm going to put on the picture too.
Of course the Simply Scrappin Kits were made for scrapbooking. They make it so easy! Your theme and colors are already done for you. If you're making a 6X6 book, just cut all of the solid cardstock into 4 equal sections, and your page bases are all ready to go.
Happy stamping!

Jana Signature

Friday, December 10, 2010

CAS card # 1

This was literally a 5-minute card, and I think that included cleaning the stamp! The cardstock was already cut, so all I had to do was score it, apply the stickers, stamp the sentiment and fold up the corner.
I love this Simply Scrappin' Kit! It's Friends and Flowers from several years back. But all of the colors are still around: Chocolate Chip, Certainly Celery, So Saffron, Tempting Turquoise, Pumpkin Pie, and Rose Red.
I think I will make this card again after I get home. I'd like to do it using an acrylic block inked up in place of the squares.
Happy stamping!

Jana Signature

Thursday, December 9, 2010

Self-imposed limited supply challenge

Happy December! I'm so sorry for the lack of posting. All I can say is life has been completely crazy! Right now I'm traveling for business. I'm in southern California; don't you feel sorry for me? I packed in a hurry, so I only brought a few stamping supplies with me: a retired Simply Scrappin' kit, a sentiment set, markers, and ribbon. It seemed like a good idea at the time, but now I'm not too sure what I'll be able to come up with. Definitely CAS (clean and simple) cards for the duration of this trip!
I do have one idea knocking around in my head, so I promise that I will make a card tonight to post tomorrow. And I'll do my best to get back on my regular posting schedule!
Happy stamping!
Jana Signature

Wednesday, November 24, 2010

Happy Thanksgiving!

Hi all! Sorry I haven't posted for a while. Life has been insanely busy, and I haven't stamped in about 2 weeks! I'm hoping to get a little breathing space soon. It sounds crazy, but I might get more stamping done when I'm traveling in December.
Hope you all have a blessed and Happy Thanksgiving!
Jana Signature

Monday, November 8, 2010

Not my usual Christmas card

This card combines this week's demonstratable card challenge (create a Christmas card that's not your usual style) and this month's WICKED color combination (Pear Pizzazz, Rich Razzleberry and Tempting Turquoise). I was inspired to do this by my friend Sarah who mentioned using the color combo for Christmas cards. It's definitely not my usual style, but I like it!
Stamps: Contempo Christmas
Paper: Whisper White, Tempting Turquoise, Hostess Level 1 DSP
Ink: Pear Pizzazz, Rich Razzleberry, Temping Turquoise
Accessories: ticket corner punch, Rich Razzleberry satin ribbon

Happy Stamping!
Jana Signature

Tuesday, November 2, 2010

Punch Art Poinsettia

This card is a CASE of a card I saw on Dawn Olchefske's blog.  It's a poinsettia made from the bird punch!  The main parts of the flower and leaves are the bird's body, and the top part of the flower is made from the wings.  The centers are punched with the retired 1/4" circle punch.  I don't think I did a great job on spacing the petals, but I love this flower!
For the sentiment, I got the idea of lengthening the decorative label punch from LeeAnn Greff's blog.  Her measurements didn't work for me though; I had to make mine smaller (unless of course I wrote down her measurements wrong).  The white part is 1 1/4" wide, and the Cherry Cobbler piece is 1 3/8"  You turn the punch upside down and slide one end of your cardstock into the punch from the center so that you only punch one end.  She had a great tip to stamp your image after the first punch so you know exactly where to punch the other end.  Her other great tip is to punch one end of the red piece then adhere the white piece to it before punching the other end.
P.S.  I had this scheduled to post yesterday, and it didn't for some reason.  Sorry for the delay!
Supplies: Stamps: Contempo Christmas; Paper: Shimmery White, Daffodil Delight, Cherry Cobbler, Garden Green; Ink: Cherry Cobbler, Garden Green; Accessories: bird punch, decorative label punch, 1/4" circle punch, sponge, cherry cobbler seam binding Happy stamping!

Jana Signature

Wednesday, October 27, 2010

Shimmery Resist Take Two

I decided to try the shimmery resist technique one more time using a more solid image.  I have found that both times I've done this technique, the embossed image is a little spotty.  So this time, I colored over the embossed image with a versamarker and embossed again.  My coloring wasn't perfect, but I like the results much better this time!
Supplies: Stamps: Inspired by Nature, Filled with Love; Ink: Chocolate Chip craft and classic, Certainly Celery, versamarker; Paper: Baja Breeze, Chocolate Chip, Greenhouse Gala DSP; Accessories: clear EP, chocolate chip satin ribbon (retired), scallop edge punch
Happy stamping!
Jana Signature

Monday, October 25, 2010

Shimmery resist

This week's demonstratable card is to use shimmery resist.  For this technique, you stamp and emboss an image onto colored cardstock.  Then you apply shimmer paint over the embossed image and then wipe the excess off the embossing.  You can also stamp with the shimmer paint.  It's hard to tell that I did that on my focal image, but you can see it at the end of my sentiment.
My card is 8 X 5 1/4 Very Vanilla scored at 4" then adhered to a 4 1/4 X 5 1/2 piece of Cherry Cobbler.  This is a great way to use a white or vanilla cardbase but still add some stability to it.
Supplies: Stamps: Filled with Love, Heard from the Heart; Paper: Very Vanilla, Old Olive, Cherry Cobbler, Jolly Holiday DSP; Ink: Cherry Cobbler (regular and craft); Accessories: champagne shimmer paint, ticket corner punch, cherry cobbler seam binding
Happy stamping!
Jana Signature

Sunday, October 17, 2010

Sock Monkey's Back!

This week, I'm using a previous card I made as a sketch.  The color combo came from Diva Coffee Break Designs: Crumb Cake, Cajun Craze and Marina Mist.  I immediately thought these would be great for sock monkey, and Rhonda had embossed a bunch of cardstock for me including Cajun Craze!  Whoohoo!  I stamped him on watercolor paper so I could try to color him well.  I'm not much of a watercolorer (is that a word??), but I think I got a little shading on there anyway.
Supplies: Stamps: Sock Monkey, Woodgrain, Perfect Punches; Paper: watercolor, very vanilla, Marina Mist, Cajun Craze, Crumb Cake; Ink: black StazOn, crumb cake, cajun craze, marina mist; Accessories: square lattice embossing folder, large oval punch, aquapainter, Marina Mist narrow taffeta ribbon Happy stamping!

Jana Signature

Monday, October 11, 2010

Faux Linen

This week's demonstratable card challenge is faux linen.  I love the soft look of this!  I paired it with a WICKED challenge to make a non-Halloween card using Halloween colors (gray, green, purple, orange).  I added yellow.
I used Flores Suaves as my main set (from Celebrando Creatividad--the Spanish catalog).  I stamped the background in Basic Gray onto glossy cardstock then sanded in both directions.  Next, I sponged on So Saffron and sanded again.  The tulips are stamped in Pumpkin Pie, So Saffron, Concord Crush and Pear Pizzazz.  I used an aqua painter to blend the colors in the tulips a bit then sanded lightly again once the flowers were dry.
Supplies: Stamps: Flores Suaves, Vintage Vogue, Sanded; Paper: glossy white, Basic Gray, So Saffron; Ink: Basic Gray, So Saffron, Pumpkin Pie, Concord Crush, Pear Pizzazz; Accessories: antique brad, Pear Pizzazz ribbon, sanding block, spongeHappy stamping!

Jana Signature

Thursday, October 7, 2010

Box in a Bag

 Last night, I had a workshop at Louise's house.  Deb and Pauline were there too, and we had so much fun!  I'm disappointed that I forgot my camera so you could see us.  We used Dazzling Diamonds on the Christmas card we made, and we all looked like fairy princesses!  Even the cats sparkled!
The other project we made was the Box in a Bag.  This was very popular a while back, but I never made one before now.
Here is the inside of the bag.  It has a little box made from cardstock as the base so that it is sturdy.  The base is 3" square, and the bag is 5 1/2" tall.
It's also economical!  You can get 2 of these from a sheet of cardstock and a sheet of DSP! (I used Garden Green cardstock and retired DSP from last year's Holiday Mini.)  The piece of DSP is 5 1/2" X 11".  The box is made with a 4 1/2" square of cardstock.  So cut a sheet of cardstock the long way at 4 1/2"--you'll have a 4 1/2" X 11" piece and a 4" X 11" piece.  Then cut 2 4 1/2" squares from one piece.  Take the 4" piece and cut off 2 1" X 11" strips for the decorative borders at the bottom.  That leaves you with enough scrap cardstock to punch out the tab punches to run your ribbon through.
To make the box base, score all 4 sides at 1" then score diagonally from each corner to make little pleats that fold in.  (Click on the link in the first paragraph for a great tutorial on Splitcoaststampers!)
Happy stamping!
Jana Signature

Sunday, October 3, 2010

Polished stone

Do you remember polished stone?  It seems like it's been forever since I did this one.  It's very dramatic!  I got the color combo from the Diva Coffee Break Designs blog: Baja Breeze, Regal Rose, Pear Pizzazz, Concord Crush.  I think the pear got a little lost in the other colors though.  I used gold smooch spritz to create the veining of the "stone"; it makes a great substitute for the metallic reinker!
Supplies: Stamps: Fifth Avenue Floral, Hodgepodge Happiness; Paper: glossy, Baja Breeze, Regal Rose; Ink: Baja Breeze, Regal Rose, Concord Crush, Pear Pizzazz, black StazOn; Accessories: alcohol, gold smooch spritz, Concord Crush ribbon Happy stamping!
Jana Signature

Wednesday, September 29, 2010

Waffle paper

Have you noticed the new waffle paper in the Holiday Mini?  There are 2 different packages: black and brown or gold and silver.  Rhonda and I decided to split a pack, and I just got my share on Sunday.  Here's my first attempt at using it.
I cut a 4 X 4 piece of the black waffle paper.  I inked up Medallion with Pretty in Pink craft ink, stamped it onto the waffle paper and embossed it with Irridescent Ice EP.  I added a vintage brad to the center.  I used Mono Multi to adhere it to a Pretty in Pink cardbase.  The final touches: scallop trim border and black satin ribbon.
Supplies: Stamps: Medallion; Paper: Pretty in Pink, black waffle paper; Ink: Pretty in Pink craft; Accessories: Irridescent Ice EP, vintage brad, Basic Black satin ribbon
Happy stamping!
Jana Signature

Sunday, September 26, 2010

Bleached Manhattan Flower

This card started with a challenge from an SUO Challenges blog.  Their latest challenge was to use the Big Shot.  Now I'm the last demonstrator on the planet who doesn't own the Big Shot, but my downline Rhonda has a Cuttlebug and a couple of the embossing folders.  (She hooked me up with some more embossed stuff on Friday night.  Thanks, Rhonda!)  So I already had this embossed image from the Manhattan Flower embossing folder.  The cardstock is Elegant Eggplant, so I was trying to figure out what I could do with it to make the embossing stand out.  Suddenly I thought of bleach!  What if I painted the inside with bleach?  I didn't think to take a picture of what it looked like, but the bleached part turned pink.  Of course it was uneven and had some purple still in it, so I decided to color it with Melon Mambo marker.  I think the unevenness of the bleaching gives it a little depth.  I'm happy with it!
Then came the hard part--what to do with the flower!   I wanted the flower to stand out, so I ended up using a Crumb Cake cardbase.  I stamped a couple of the flowers from Fifth Avenue Floral in Eggplant and Melon then added some crochet trim and a piece of Eggplant cardstock.
Supplies: Stamps: Fifth Avenue Floral; Paper: Crumb Cake, Elegant Eggplant; Ink: Melon Mambo, Elegant Eggplant; Accessories: bleach, aquapainter, Manhattan Flower embossing folder, crochet trim, scallop trim border punch, pearls
Happy stamping!
Jana Signature

Thursday, September 23, 2010

CAS fall color challenge

This week's CAS challenge on SCS was a fall color challenge: kraft, vanilla, brown and red.  To me, nothing says clean and simple like a one-layer card, so that's what I decided to do.  I used Inspired by Nature, inking up the coneflowers in Riding Hood Red and Soft Suede.  I stamped the grass in Crumb Cake.  I gave the whole card a spray of Vanilla Smooch Spritz and added a fork bow.  The ends of the trim are cut off even with the edge of the card and adhered with Mono Multi.
Supplies: Stamps: Inspired by Nature; Paper: Crumb Cake; Ink: Riding Hood Red, Soft Suede, Crumb Cake; Accessories: vanilla Smooch Spritz, Victoria crochet trim
Happy stamping!
Jana Signature

Monday, September 20, 2010

Glitter window

Lately, I've been revisiting old favorite techniques. This week, I made a glitter window card. I saw this version of the glitter window back in 2008 at the Milwaukee regional. My tutorial is here.
For this week's card, I went super simple. Instead of using punches, I used the die-cut Fresh Cut note card. All I had to do was trim it to size, pop out the petals and apply the packing tape. (I did stamp it with Fresh Cuts first.) I chose a wild color combo that I got from the Color Lab site: Tempting Turquoise, Poppy Parade, Pear Pizzazz and Crumb Cake.
To tie the ribbon, I cut a slit in the ribbon and slid the other end through, tying it with linen thread. I love the look, and it lies so nice and flat!
Supplies: Stamps: Fresh Cuts, Extreme Elements; Paper: Fresh Cut Notes, Crumb Cake, Level 1 DSP; Ink: Pear Pizzazz, Tempting Turquoise, Crumb Cake, Poppy Parade; Accessories: cosmo glitter, neutral button, pear pizzazz ribbon, linen thread, packing tape
Happy stamping!

Jana Signature

Friday, September 17, 2010

Making a mat for the decorative label punch

Like I said in Wednesday's post, I saw this done on the northshorestamper blog. She has a great video, but I couldn't see exactly how to cut the pieces. Hopefully these photos will help.
To make the mat, punch the decorative label twice. Cut one in half horizontally and cut the other in half vertically.
As you can see in the above photo, I took the one that was cut in half vertically (on the left) and cut at an angle from the middle of the top and bottom "bumps" to the center of the cut edge. For the one cut in half horizontally (on the right), I cut off the side bumps completely.

Next I took the longer pieces and adhered them to the back of a whole punched piece.

Next, I adhered the side pieces, lining up the partial "bumps" with the edges of the top and bottom pieces. This photo shows the back of the piece so you can see how the edges line up.
Happy stamping!


Jana Signature

Wednesday, September 15, 2010

Christmas card in progress

I'm starting to work on my Christmas card design. I got the idea fromthe Holiday Mini to layer the ornament punch over the decorative label punch. I knew that I wanted to use the Jolly Holiday DSP, Cherry Cobbler seam binding and the Contempo Christmas stamp set. I was trying to figure out how I could have the card base be Old Olive and the ornament be Cherry Cobbler. I saw a video at www.northshorestamper.com where she created a mat for the decorative label punch. Could this be the answer I was looking for?

Here are the 2 cards I created. What do you think? Which DSP do you prefer? Which way does the label look the best? Is the Old Olive label too much Old Olive combined with the base? I'm undecided, and I'd love your opinions and suggestions! (I'm also thinking of adding glitter to the center sections of the ornament, but I can't do that until I get home this weekend. )
On Friday, I'll have some photos for you showing how I made the mat for the decorative label punch.
Happy stamping!

Jana Signature