Last week, we celebrated the 100th week of demo challenges on SCS! Wow, it's hard to believe we've done that many already. In honor of that, I wanted a sparkly workshop wow challenge, so we did Sparkly Stained Glass. Believe it or not, this technique is actually very easy, and the glitter doesn't fly all over the place either. You stamp a line image onto a window sheet (acetate) then apply Crystal Effects to the back side and sprinkle with glitter. You can do one color right after the other without waiting. The only downtime is waiting for it to dry. I let mine dry overnight. All the glitter is on the back, so it's contained. I hope you give it a try!
Supplies (all SU): Stamps: Flores suaves, Refuge and Strength, Tres Chic; Paper: Bashful Blue, Naturals White, Basic Black; Ink: Black StazOn, Bashful Blue, Elegant Eggplant, Tempting Turquoise; Accessories: window sheets, Very Vanilla HPH, designer label punch, fine cosmo glitter, Crystal Effects, black grosgrain ribbon, Elegant Eggplant grosgrain ribbon
Happy stamping!
Wednesday, April 29, 2009
Monday, April 27, 2009
Scallop card folder from Regional
Here's another project from Regionals. Yes, we did a TON of projects! And I haven't even done the scrapbook page yet...
This is a folder that holds 3 scallop notes. The focal image on the front of the folder is a metal edge tag with Pink Pirouette textured cardstock added. The bird from Best Wishes and More is stamped on a scrap and then cut out. (Yes, Carol, I got his feet cut out too! I'll admit it was a bit tricky.)
Friday, April 24, 2009
Regional Big Shot Project
Here's another project from the Minneapolis Regional. I don't have a Big Shot or any other die-cut machine, so it was fun to use the Big Shot! Both the basket and the tag were from the Baskets and Blooms die. The basket is almost 4" tall, so it would be a good table favor at a party. The flowers on the tag are from the flower of the Best Wishes and More stamp set that we got. It's amazing how different the flower looks just by using the center punched with a circle. And I just love So Saffron and Tangerine Tango together; it's a great color combo!
Happy stamping!
Happy stamping!
Wednesday, April 22, 2009
More watercoloring with markers
I only have Bold Bright markers (plus neutrals and Chocolate Chip), so that limits my coloring with them. But I really love the way watercoloring with them tones them down a bit. I decided to color the butterfly from Flores Suaves, one of my all-time favorite images. First, I stamped the butterfly, then I masked it and stamped the words over the mask. I used black StazOn for both. The butterfly body is Glorious Green topped with Brilliant Blue. I used Orchid Opulence for the main part of the wings and Lovely Lilac for the edges. I wanted to use Baja Breeze to simulate the sky, so I swiped my stampin' spot all around the edges and then blended with the aquapainter. I had trouble getting all of the lines out, but I think it gives it a vintage look. Next time, I will wet the paper first before adding the ink directly from the pad.
My card base is Orchid Opulence, and I stamped Sanded on it with white craft ink. (Oops, I burned the bottom corner a bit when I was heat setting the ink. I've never had that happen before!) I cut a band of Lovely Lilac and used the scallop border punch on both top and bottom edges. Then I tied some lovely black ribbon from the Valet Ribbon Originals and added one of the new jumbo grommets from the Occasions Mini over the knot. The grommet has prongs on the back that push right through the cardstock; I used my bone folder to push the prongs down. (The hole in the center is 1/2".) An all-occasion word from Warm Words is the finishing touch.
Happy stamping!
Tuesday, April 21, 2009
Never ending card directions
I got these directions from Dawn Griffith's blog. She has an awesome video that I highly recommend. I'm just posting pictures for those who have trouble watching videos online.
For this project you need 4 pieces of cardstock that are each 3" X 6". Each piece should be scored down the long way at 1 1/2" and 1 1/2" from each end. Lay 2 pieces down vertically, touching edges, and put adhesive in the 4 corners as shown above.
Lay the other 2 pieces down horizontally, lining up all of the edges with the bottom pieces.
Fold the top 2 pieces as shown to crease the score lines.
Fold the whole thing back along the same score lines. This is what it looks like from the back.
This is what it looks like from the front
Fold the 2 squares in the center out to each side so the card looks like this. Now you've creased all of the score lines. See yesterday's post for all 4 views of the card.
A couple of tips: I found that line images work best because you can't stamp the card before it's put together. Solid images don't stamp solidly on the score lines. (Ask me how I know!) Also, think about the placement of your images carefully before stamping. When I stamped the balloons on the 2nd card view, I centered them. When I folded for the 3rd view, the balloons were still visible, but I could only see 1/2 of each balloon! That's the only area that overlaps that I can think of, but be careful!
I hope you try this card because it's a real wow!
Happy stamping!
Monday, April 20, 2009
Never ending card!
Today's project is the never ending card. It's so amazing! Today I'll show you all of the views of the card, and tomorrow I'll post how to make it.
Here is the first view of the card. I think you can tell that it opens in the center. You fold both sides back.
Sunday, April 19, 2009
A blogging note
Friday, April 17, 2009
WICKED sketch card
I made this card using the sketch from this month's WICKED stamper, Emma Fawkes. It's a pretty simple card. I made my card a 4 1/4" square, and the base is Very Vanilla. The diagonal pieces are from To the Nines specialty DSP. It's textured and cardstock weight! I cut a 3 3/4" square, cut it on the diagonals, and flipped 2 of the pieces. The flower is from the Pretties kit. I got that great color on it by using craft ink; that's a tip I picked up from Regional. I added a chocolate chip corduroy button brad to the center of the flower and adhered it with a pop-up glue dot.
Happy stamping!
Happy stamping!
Wednesday, April 15, 2009
Another project from Regional
Here's another project using the Soft Summer stamp set from the Occasions Mini. This set is for 2-step stamping, so it has both solid and outline stamps for the same image. The solid stamp was used to create the background on the card, and the outline stamp is colored in using watercolor crayons and an aquapainter. The Bashful Blue is just a 1/8" strip of cardstock adhered above the strip of Urban Oasis DSP; I like to use the 2 way glue pen for small pieces like this. TIP: The ribbon isn't tied around the clip. It's just tied in a knot and adhered with a mini glue dot!
Happy stamping!
Happy stamping!
Monday, April 13, 2009
Inspired Color Combo
I have 2 sources of inspiration for this card, which I made for last week's Workshop Wow challenge. The color combo was inspired by a card that Beate Johns posted a few weeks ago. I love that the colors are all neutrals! The color combo is: Whisper White, Kraft, Sahara Sand and Basic Gray. The layout of the card was inspired by Jaron Winder. He works for Stampin' Up! and did a presentation about inspiration at the Regional I attended. Most of his projects used circles, and one of his cards was very similar to this one in layout. I used bigger circles and added circular stamped images from Seeing Spots. I also added the round frame around the sentiment to continue the circle theme. I hope the color combo and card inspire you!
Happy stamping!
Happy stamping!
Friday, April 10, 2009
SCS swap # 3
Are you asking yourself what happened to swap # 2? Well, for that group, I made a hinge card very similar to the one I already posted. I just changed the color combo to Regal Rose, Rose Red and Certainly Celery.
Now on to swap # 3. I wanted to use rose red grosgrain ribbon, so I had one color already. I got this combo from my old friend the color coach. The other 2 colors are So Saffron and Garden Green. The cardbase is So Saffron with Itty Bitty Backgrounds stamped on it in VersaMark. The Garden Green strip is 1 3/4", and I used the eyelet border punch on both edges. For the focal image, I cut the cardstock the same size as the stamp block. I stamped the butterfly first in Basic Gray, masked it and then stamped the words in Garden Green after stamping off once. I colored the butterfly using ink and aquapainter. The final touch is a flower ribbon slide tied into the knot of the ribbon.
Happy stamping!
Wednesday, April 8, 2009
Regional Swap # 1
I hosted a SCS swap for the regional. I love doing SCS swaps because they are such high quality. I did 3 sets of 10 cards and got a bunch of awesome ones in return. Here's my first swap. I wanted to use Real Red grosgrain ribbon and a little bit of Rockabilly DSP, so that determined my color combo. I'm so proud of myself for using an unusual layout, at least it's unusual for me. I have a few standard layouts that I use all the time, and I didn't do that here! I also love the curly label punched Rockabilly DSP with a scallop square layered over it. I got that idea from a swap that my upline Sandi had from Leadership (I think).
Supplies (all SU): Stamps: Priceless, Tres Chic, Sanded; Paper: Whisper White, Old Olive, Real Red, Rockabilly DSP; Ink: black StazOn, Real Red, Old Olive; Accessories: Real Red grosgrain ribbon, scallop square punch, designer label punch
Happy stamping!
Supplies (all SU): Stamps: Priceless, Tres Chic, Sanded; Paper: Whisper White, Old Olive, Real Red, Rockabilly DSP; Ink: black StazOn, Real Red, Old Olive; Accessories: Real Red grosgrain ribbon, scallop square punch, designer label punch
Happy stamping!
Monday, April 6, 2009
Stampin' Up regional rocked!
Well, Rhonda and I had a fabulous time in Minneapolis this past week! The Stampin' Up! regional seminar was on Friday. We drove down on Thursday night and came home on Saturday. What's the best thing about regionals? The people, of course! I got to meet and hang with my SCS peeps, which was totally awesome! This is me with Sarah (AKA Superglew). She is one of my most faithful challenge participants, and it was so great to meet her in person. She is a lot of fun! (Notice my necklace? I made it myself, and Jaron commented on how much he liked it! It's similar to this one but uses last year's SAB rub-ons.)
I also organized an SCS swap because the quality of SCS swaps is always outstanding! Thanks to all of you who participated! I'll be showing my swap cards and some others in the coming days.
SU brought 25 Big Shots for us to use! We made 2 projects using it. Here you can see the long tables where they were set up. The display boards are behind that.
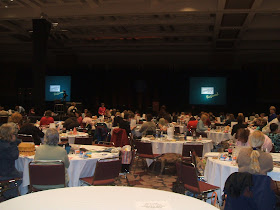
Here's a view of the room. The stage is at the back of the photo between the two big screens. I'd estimate there were 300-350 people there.
This is the only project I completed while I was there. (Don't worry; I'll get the rest done soon!) This card uses Soft Summer, a set from the Occasions Mini. We used markers and the aquapainter to watercolor, and I'm now in love with this set, the technique and the card! The key is using watercolor paper so you can move the ink with the aquapainter. I just drew some lines with the marker in the area I wanted to color, and it made the shading easy!
Happy stamping!
Happy stamping!
Friday, April 3, 2009
Pauline's latest creation
Wednesday, April 1, 2009
Never Ending Card
I don't have a card for you today, but I do have a challenge: make a never ending card! Get the directions and examples here. Happy stamping!