Here is the card I made for this week's Workshop Wow challenge. I challenged my fellow demonstrators to find new ways to use ribbon. This card is actually similar to the birthday card I made for Shirley back in January. I changed the sentiment, the punched image and the way I tied the ribbon. The So Saffron ribbon is frayed or fringed just by pulling on one end and unraveling it. TIP: I slid the So Saffron ribbon underneath the Certainly Celery ribbon BEFORE I unraveled it so I wouldn't have to try to slide all those little strands under there.
We also made this card at Wednesday's workshop, and I let them choose which ribbon technique to use; they all chose to tie the 2 colors of ribbon together--no fringing.
Happy stamping!
Friday, February 27, 2009
Wednesday, February 25, 2009
SAB bookmark
Remember the bookmark from this post? Here is a modified, much cuter version! I started with one of the SAB patterned papers. I folded it just the way I did the first one. But then I put this one in my paper cutter. I pushed the folded edge up to the cutting guard and cut. Then I unfolded the bookmark and used the new eyelet border punch along the edge and refolded it. If you want a photo tutorial, let me know and I'll do one. Thanks, Rhonda, for lending me your punch! We'll be making this at my workshop tonight. I'll try to remember to take some pictures and post them.
Edited to add: Sorry this post is late. I accidentally put the posting time as 10PM instead of 10AM!
Happy stamping!
Edited to add: Sorry this post is late. I accidentally put the posting time as 10PM instead of 10AM!
Happy stamping!
Monday, February 23, 2009
Le Jardin Botanique swap card
I signed up for Kim's new catalog swap. I wasn't going to do one, but Kim's are always awesome! I signed up for Le Jardin Botanique, which is one of my favorite new stamp sets. I started planning this card a month ago but didn't get it done before my trip to CA. Friday night was craft night at church, and I got them done! I was so happy with how they came out that I decided we will do this at Pauline's workshop Wednesday night. The only difference is that we will use textured cardstock for the cardbase so we won't stamp a background on it.
The flower is stamped with Basic Brown ink onto Confetti White cardstock and then colored with ink and a blender pen. I cut the Urban Oasis DSP 1/4" wider, punched one end with the scallop border punch and then scored it at 3/4". I adhered the flower image so it just fit under the "awning" I created and then tore the other end to finish the mat. A piece of the new white organdy ribbon finishes it off. This ribbon ties beautifully but still holds its shape.
The Kiwi Kiss cardbase is stamped with the Sanded background in Kiwi Kiss ink and then with the sentiment in Basic Brown down in the bottom corner.
Supplies (all SU): Stamps: Le Jardin Botanique, Sanded; Paper: Confetti White, Kiwi Kiss, Urban Oasis DSP; Ink: Basic Brown, Baja Breeze, Kiwi Kiss; Accessories: scallop border punch, white organdy ribbon
Happy stamping!
Friday, February 20, 2009
Hanging heart pouch
A few weeks ago, the 3D demo challenge was to make a hanging heart pouch. This adorable project was created by Barb Mullikin. The directions are on her blog here. She used the petal card die for the Big Shot. One of the demos on SCS was kind enough to create a template to use for those of us who don't have the Big Shot. I printed out the pattern onto So Saffron cardstock and then adhered DSP to it (using glue stick) before cutting it out so it would be more sturdy.
I made this for Daniel for Valentine's Day. I used the SaleABration designer paper because it has hearts but it's not too girly. Blue gingham ribbon forms the handle.
Happy stamping!
I made this for Daniel for Valentine's Day. I used the SaleABration designer paper because it has hearts but it's not too girly. Blue gingham ribbon forms the handle.
Happy stamping!
Wednesday, February 18, 2009
Caribou inspires me!
Sorry for the late post! My internet is down at home. Shh, don't tell my boss I'm posting from work, OK?
For this week's workshop wow challenge, I was inspired by this cup wrap from Caribou Coffee.
I chose to make a stationery portfolio. I originally posted about them here. I used Chocolate Chip, Kiwi Kiss, Baja Breeze and Riding Hood Red. I haven't used my Big Flowers set in ages, so I used that in place of the snowflakes.
The stationery portfolio is a great workshop project. It holds standard sized cards and envelopes, so it makes a great gift as well.
Monday, February 16, 2009
Valentine Mailbox
I hope you all had a happy Valentines Day! I got back home the day before, so I was very happy!! I also got roses from my 2 favorite men, so I have no complaints.
Before I left town, I decorated a Target mailbox for my mom and sent it to her filled with candy. She loves Baja Breeze, so I chose Urban Garden DSP to decorate the mailbox.
I decided that it would be easiest to place the seam where the flag is attached to the mailbox, so I made a piece of faux rickrack to cover up the seam. I attached a felt flower to each side of the flag and tied on a piece of Kiwi Kiss satin ribbon.
Here is a closeup of the flower on the front of the mailbox. I cut these from one of the papers in the Urban Garden package. I cut the full flower in Kiwi Kiss, a smaller area in Baja Breeze and the center in Not Quite Navy. I covered the NQN piece in Dazzling Diamonds with the 2 way glue pen.
I believe all 3 of my posts this week will be 3-D items--quite unusual for me, so stay tuned!
Happy stamping!
Friday, February 13, 2009
Love You Much swap # 6
Last, but certainly not least, is this spinner card by Jane Walker. I've never seen a spinner done on just a card front before. The spinners I've done go through the entire card front while this one doesn't. I can't wait to try it!
As you read this, I'm flying home. Whoohoo! I did take some stamping stuff with me as I have a swap due soon. Can't wait to get back to stamping and posting.
Happy stamping!
Wednesday, February 11, 2009
Love You Much swap # 5
Tuesday, February 10, 2009
Wine Country
On Sunday, Kristen took me to Temecula where they have lots of wineries. We were driving through the hills. This was my view while we were driving. Many of the areas hit by the wildfires are already turning green. It was just beautiful!
This was at Wilson Creek Winery, the first of three wineries we visited. We did a tasting at each winery, and I bought some great wine and champagne to bring home.
Monday, February 9, 2009
Love You Much swap # 4
Saturday, February 7, 2009
Fun in not-so-sunny California
Friday, February 6, 2009
Love You Much swap # 3
Wednesday, February 4, 2009
Love You Much swap # 2
Monday, February 2, 2009
Love You Much swap # 1
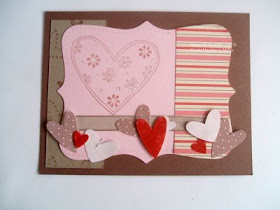
I'm traveling the next two weeks for work (I have to go to Southern California. Don't you feel sorry for me? LOL), so I'll be sharing swaps I received using the recent Love You Much bundle. For this swap, we had to use the Love You Much stamp set, Candy Lane DSP and the Heart to Heart punch. I am amazed at the variety in the swaps I received! Everyone did a wonderful job! First up is this lovely card by Tracy Riekenberg. I love the layout and the creative use of the punch.
Happy stamping!
Happy stamping!
Sunday, February 1, 2009
How do you like the new blog template?
What do you think of my new blog template? Elizabeth, who is a GENIUS, has posted a ton of free blog templates here. I couldn't get mine installed, and she not only installed it for me, she also created my new header, e-mail button and signature! What a sweetheart!