Friday, July 31, 2009

Quick Razzle Dazzle


First of all, sorry for the poor photo! My computer is dead and awaiting the arrival of a new motherboard. Until then, I'm using a laptop with no photo editing software, and I can't download any. (Edited to add: My computer is back up and running minus all photos, documents, favorites, etc. But at least I could upload and fix the photo so it looks much better!)
On to the card! I just got some Razzleberry Lemonade DSP, and I love it! I didn't think I would, but it's so pretty in person. I can't wait to make some more cards with it. Today's card is a simple one. The base is Melon Mambo textured cardstock 4 1/4 X 11, scored at 5 1/2. The DSP is a 3 3/4 square cut diagonally from all corners to form 4 triangles. I flipped 2 of them over so you can see both sides of the DSP. The triangles are adhered to a 4" Chocolate Chip textured square. In the center I added 2 flowers from the Pretties kit and used a Chocolate Chip corduroy button/brad for the center. A sentiment from Heard from the Heart in Whisper White completes the card.
Happy stamping!

Wednesday, July 29, 2009

Another 3-D Card

Here is another 3-D card. We'll be making this at my next workshop. For this card, I used one piece of cardstock for the inside. I started with a piece of Naturals Ivory 3 3/4 X 7 1/2. I stamped the horse in Soft Suede. I started at the right then just kept stamping off to the left to show movement. Then I stamped a horse on another piece of cardstock, cut it out and adhered it with dimensionals. For the background, I used JanTInk's moonlighting technique. I punched a 1 1/4" circle from a Post-It note. I used the hole in the post-it as a stencil to sponge the sun in So Saffron. Then I used the punched piece to mask that circle. I added color in the following order: More Mustard, Pumpkin Pie, Really Rust and Close to Cocoa. Then I scored the cardstock at 3 3/4 and adhered it to the inside of the 3-D card. I put the adhesive on the Soft Suede piece--the left side and the top triangle of the scored side that folds in. That way, the inside piece will stay flat with no score line when the card is folded closed.
Happy stamping!

Monday, July 27, 2009

Paper Bag Purse

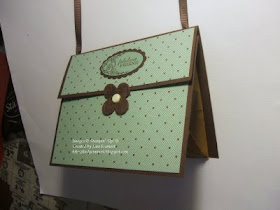
Not too long ago, I saw the cutest purse made from a paper bag on Becky Roberts' blog. I knew that I had to make one. It was so easy and so cute! Here is the front view.
Here is the side view. I used a retired felt flower with a brad to hold the flap closed instead of a velcro dot.
Supplies (all SU): Stamps: Oval All; Paper: chocolate chip textured, To the Nines DSP; Ink: Chocolate Chip; Accessories: scallop oval punch, small oval punch, Flower Fusion (retired), 5/16" brads, Chocolate Chip narrow grosgrain ribbon, 1/8" hole punch, paper bag
Happy stamping!

Friday, July 24, 2009

3-D card how-tos

A while back, I posted a fun 3-D card that folds flat. Check it out here. Today, I'm sharing how you can make one for yourself.

Start with an 8X8 piece of cardstock; here I've used Soft Suede textured cardstock. (I like to use the textured cardstock because it's a little thinner than regular cardstock.) Score the cardstock at 4" in both directions. Fold the cardstock along the score lines. In the upper right quadrant of the cardstock, score a line from the center to the outer corner. Fold along this score line in a mountain fold. Cut from the center of the cardstock down to the bottom. (You can see the folds and the cut in the photo.)
Grab the lower right quadrant of the cardstock and slide it under the lower left quadrant until they line up, and adhere them together. This will pull the card into the 3-D shape so it looks like a box with 2 sides cut away. Decorate the inside as desired. I adhered a 3 3/4" piece of cardstock to the bottom and both sides of my original card. On the side with the fold, only adhere the cardstock to the top triangle. That way, you can fold the card flat without folding the inner decorated piece of cardstock. (Look at my original post to see what I mean; I have a photo showing it partially closed.)
Feel free to e-mail me or comment if you have any questions. If you make this card, please post a link so I can enjoy it too!
Happy stamping!

Wednesday, July 22, 2009

Fun and Easy Butterfly


My good friend and challenge co-hostess, PattyB, introduced me to this wonderful butterfly. She found the directions here. Believe it or not, it is made from two squares of DSP! You fold each square in half on the diagonal and then accordian fold from there. My squares are 3 1/2" and 2 3/4". My butterfly got a little cockeyed; I think I needed to tie the ribbon tighter. I used the retired Urban Oasis DSP and Basic Gray taffeta ribbon.
Happy stamping!

Monday, July 20, 2009

Getting Back in the Swing of Things

Sorry I didn't post on Friday! Life has been a bit crazy the last few weeks, and I haven't been stamping much.
To get back in the swing of stamping, I decided to make a 3X6 card which fits into a small open-ended envelope. I started with a 6X6 piece of Melon Mambo textured cardstock. TIP: I like using the textured cardstock when I'm making a quick card because it adds visual interest without any extra work.
I inked up the flower from Best Wishes and More with Melon Mambo ink and used a sponge dauber to add some Rich Razzleberry around the edge. I stamped 3 of these and punched them out with the 1 3/8" circle punch. Next I used the scallop circle punch to punch out 3 Melon Mambo circles and 3 Rich Razzleberry circles. I placed the Rich Razzleberry circles behind the Melon Mambo ones and turned them so you can see the scallops of both circles. Some Rich Razzleberry ribbon and a sentiment complete the card.
Happy stamping!

Wednesday, July 15, 2009

Twist and Drag technique

This week's workshop wow challenge is the twist and drag technique. Here are the instructions from a glossy cardstock technique sheet I have: Choose a "solid" style stamp that is simplistic in design such as one that is a squiggle, or confetti, or thick dots. Ink your stamp of choice with a light color of ink. Then twist it (or drag it) onto your glossy cardstock. Repeat a few times to create a one-of-a-kind background.
I'm not totally happy with the result; maybe my ink pads were too juicy.
Supplies (all SU): Stamps: Wanted; Paper: glossy, Very Vanilla, Crushed Curry, Dusty Durango, Kraft; Ink: Soft Suede, Dusty Durango, Crushed Curry; Accessories: Chit Chat rub-ons, scallop circle punch, small star punch, ticket corner punch, 5/16" brad, chocolate chip narrow grosgrain ribbon, crushed curry grosgrain ribbon
Happy stamping!

Monday, July 13, 2009

A Blast from the Past

It seems like so long ago that Fresh Cut notes were the big new thing, but they're still around! They even have some relatives in the new catalog, so be sure to check them out!
I got my color combo from one of the new DSPs: Orchid Opulence, Rich Razzleberry and Old Olive. I stamped Tres Chic in Orchid onto the notecard and then punched out the die-cut petals. I punched a five petal flower from Rich Razzleberry textured cardstock and attached it behind the opening with a Chocolate Chip 5/16" brad. I added an Old Olive felt flower to the front. I sponged Rich Razzleberry ink around the edge of the card and tied a Rich Razzleberry ribbon knot. Very quick and easy!
Happy stamping!

Friday, July 10, 2009

3-D Card

Every month, SU sends demonstrators a magazine called Stampin' Success. Last month, they featured a 3-D card. Here's my version. I used Inspired by Nature. The color combo is Crushed Curry, Melon Mambo, Bashful Blue and Old Olive.
The grass is stamped on the Bashful Blue, and the flowers are cut out and popped with dimensionals.

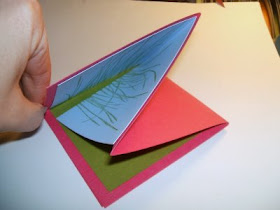
Here you can see how one of the blue panels is not fully attached to allow the card to fold flat.

Happy stamping!

Wednesday, July 8, 2009

One Layer Card

I wanted to use some of my new stuff, so I decided to make a one layer card using my new Circle Circus stamp set. I got the color combo from SU's new In Color Combo chart; it's Crushed Curry, Going Gray and Basic Gray. I also did a bit of masking. I decided I'll add a sentiment later once I decide what I want to use the card for.
Happy stamping!

Monday, July 6, 2009

Remaking a card

This is a swap cardfront that I got last spring. It was done by inkymom, and I just love it! These peanuts crack me up (no pun intended)! It's on the dormant list now, so it's still available. Maybe I'll have to give in and get it... Anyway, I couldn't just get rid of this, so I decided to make a new card with it.
All I did was carefully pull off the focal image and adhere it with dimensionals to a new cardfront. I used a Kraft card base and some now retired DSP. The horizontal slot punch makes a great opening in the fold of the card to put the Kraft taffeta ribbon through.
Do you have any cards or swaps that you can reuse?
Happy stamping!

Friday, July 3, 2009

Interlocking medallion card

A few weeks ago, I found this awesome card on my friend Qbee's blog. She was kind enough to allow me to use it for a Workshop Wow challenge. Her awesome directions are here.
I wanted my card to be masculine, so I chose To the Nines DSP and the Boho Backgrounds set. My color combo is Kraft, Chocolate Chip and Dusty Durango. I stamped the medallion 4 times: twice on Kraft with Dusty Durango ink and twice on Dusty Durango with Chocolate Chip ink. I punched out the Kraft images with the scallop circle punch and the Dusty Durango ones with the 1" circle punch for layering. I sponged Dusty Durango ink onto the DSP and Chocolate Chip ink onto the medallions and the sentiment.
Here's what the card looks like opened. Try being creative in what you use for the medallion. My friend Susie Nelson used a bear!
Happy stamping!

Wednesday, July 1, 2009

WICKED sketch

Another exciting thing that's happening today is that we announce the WICKED stamper for July on SCS. I am lucky enough to be the one who gets to ask the person to be WICKED and then receive their challenges and samples and post them. So I get a sneak peek! This month, I cheated and used the sketch in advance because it was perfect for what I wanted to do. I stamped the truck and hearts on watercolor paper and then colored the image with a combination of ink and watercolor crayons. (TIP: Rub-ons don't work well on colored watercolor paper. I couldn't get it to stick at all, so I gave up and used the colored cardstock and punch instead.)
Supplies (all SU): Stamps: Loads of Love, Loads of Love Accessories, Sanded; Paper: watercolor paper, Soft Suede, Kraft, Ruby Red, To the Nines DSP; Ink: Black StazOn, Always Artichoke, Ruby Red, Soft Suede; Accessories: watercolor wonder crayons, aquapainter, Chit Chat rubons, modern label punch, ticket corner punch, twill tape
If you're an SU demo, check out the WICKED forum!
Happy stamping!

It's New Catalog Day!

This is one of the happiest SU days: new catalog day! I've updated the photos and links on the left for the Idea Book and Catalog, Stampin' Supplies list, Celebrando Creatividad and Definitely Decorative (previously Decor Elements). The links are not live as of this posting time, but they should work after noon MT.
Happy stamping!